Montag, 31. Juli 2017

Using Eclipse CDO as a lightweight ORM solution in web applications

Introduction

For one of my projects I had to decide for an object relational mapping (ORM) solution to be used in a web environment. There is not much to think about when deciding which framework to use. Yet, I wanted to try out Eclipse CDO [1] as an alternative to, for example, hibernate.
The project is powered by CDO since a year, now. And it has proven to be a lightweight ORM solution. No JPA annotations, just design your EMF model, create instances and let CDO handle the rest...

A full request/response cycle

The following sketch shows the involved steps when a user (HTML5 client/browser) sends a HTTP request to a service that consumes the CDO storage.
Request/Response process

The web application is driven by (JAX-RS) REST services, so any call/request is served by the appropriate REST service. 
For each call which requires DB access, a new CDO transaction is opened, the request is processed, the result is converted to JSON and the transaction closed/committed.
Conversion of EMF model instances is done using Eclipse Texo [2] in most scenarios, but special view models are also created using a JSON java library like org.json [3].

The overall setup of the CDO server/backend:
  • CDO DBStore with embedded H2 RDBMS
  • disabled auditing, disabled branching (not needed by project)
  • one resource per user, central meta data resources (for example, user accounts, roles, permissions management), managed in different resource folders
    • simulation of a document oriented database
    • simplifies authorization a lot
  • nginx proxy for simple HTTPS setup
  • OSGi environment with embedded Jetty, packaged using a maven/tycho enabled Eclipse RCP product build
  • a very limited virtual host (for now): 512 MB RAM, single core Xeon CPU, Ubuntu 16.04 server
Have you ever considered using CDO as an ORM solution? Or are you already using it in a web context? What are your experiences?

Links
[1] Eclipse CDO: https://www.eclipse.org/cdo/
[2] Eclipse Texo: https://wiki.eclipse.org/Texo

Samstag, 6. August 2016

Hi5: Eclipse 4 API for web developers

About

HTML5/CSS/JavaScript seem to become the primarily stack of technologies to develop UI/frontend applications. The Hi5 project aims at providing an Eclipse 4 API port for web developers.

The following is the architectural overview of the idea behind the project:

Picture: overall architecture of the Hi5 idea

Server side

On the server side (backend) the infrastructure of the Eclipse RCP platform is handling requests that the web client doing. This includes collecting all available E4 fragments and merging them into the application model. Next, the merged application model is transformed into a HTML DOM representation which then sent to the client via HTTP.

With the Eclipse Communication Framework (ECF) there is also great support for a service driven development approach as OSGi services can serve as web services, for example, using ECF's JAX-RS integration.

Client side

On the client side you can use your favorite framework/library to provide a smooth and reactive UI. By default, jQuery, jQuery UI and jQuery mobile are used.

Deployment modes

The application can be deployed in several modes:
  • server/client mode: Eclipse RCP backend runs on a server and the client runs in a web browser
  • local mode: Eclipse RCP backend runs locally and the client runs in a JavaFX WebView instance

Demo

The following screeshot shows a demo application running in the "local mode", i.e. the client is run using the JavaFX WebView as renderer:


Summary

With HTML5/CSS/JavaScript gaining more and more attraction to developers, this approach makes absolutely sense. It allows for going with the trends of the web developer communities (with regards to UI toolkits) but relying on the Eclipse 4 and OSGi platform as a robust and modular backend.

Links

[1] Hi5 GitHub repository: https://github.com/erdalkaraca/hi5

Mittwoch, 4. Mai 2016

Eclipse lambda driven UI creation

About

With the addition of lambda expressions to the Java 8 language, you can now create nice APIs for reducing boilerplate code. One of tedious tasks has always been the creation of UI code as it involves lots of boilerplate code and keeping track of what control/widget is a child of another. This article introduces a small helper library I use in my projects. It is about a thin lambda driven API for creating structured UI code.

Conventional UI code

The following code will create a simple UI form:
private Text text;

public void createUIConventional(Composite parent) {
    parent.setLayout(GridLayoutFactory.swtDefaults().numColumns(3).create());

    Label label = new Label(parent, SWT.NONE);
    label.setText("Selection");

    ComboViewer viewer = new ComboViewer(parent, SWT.BORDER | SWT.SINGLE | SWT.READ_ONLY);
    customizeComboViewer(viewer);
    viewer.getCombo().setLayoutData(new GridData(GridData.FILL_HORIZONTAL));

    Button button = new Button(parent, SWT.NONE);
    button.setText("Apply");
    button.addSelectionListener(new SelectionAdapter() {
        @Override
        public void widgetSelected(SelectionEvent e) {
            text.setText("Selection:  " + viewer.getCombo().getText());
        }
    });

    text = new Text(parent, SWT.READ_ONLY | SWT.BORDER);
    text.setLayoutData(
            GridDataFactory.swtDefaults().span(3, 1).grab(true, true).align(SWT.FILL, SWT.FILL).create());
}


As you can see, SWT requires that you always create a new Control/Widget as a child to an existing one, i.e. you have to provide the parent as the first constructor parameter.
Furthermore, if you have lots of UI elements to create, the readability of the code quickly decreases and you can hardly see the hierarchy of the UI widgets WITHIN the code.

In the past, I often used local code blocks to denote the hierarchy of UI controls within the code to achieve better readability.

Lambda driven UI code

The above example can now be rewritten as follows:

 private SwtUI root;

 public void createUI(Composite parent) {
  root = SwtUI.wrap(parent);
  root.layout(GridLayoutFactory.swtDefaults().numColumns(3).create())//
    .child(() -> SwtUI.create(Label::new)//
      .text("Selection"))//
    .child(() -> ViewerUI.createViewer(ComboViewer::new, SWT.BORDER | SWT.SINGLE | SWT.READ_ONLY)//
      .id("selectionCombo")//
      .customizeViewer(this::customizeComboViewer)//
      .layoutData(new GridData(GridData.FILL_HORIZONTAL)))//
    .child(() -> SwtUI.create(Button::new)//
      .text("Apply")//
      .on(SWT.Selection, this::onButtonClick))//
    .child(() -> SwtUI.create(Text::new, SWT.READ_ONLY | SWT.BORDER)//
      .id("textField")//
      .layoutData(GridDataFactory.swtDefaults().span(3, 1).grab(true, true).align(SWT.FILL, SWT.FILL)
        .create()));
 }

Now, by using method pointers internally, instantiating a control/widget does not need its parent any more as it will always be parented within the current context.

You can find the code at:

https://github.com/erdalkaraca/lambda-ui

Check it out into your workspace and experiment with it. Do not hesitate to give feedback.

Dienstag, 25. März 2014

A general approach to migrating EMF models persisted into SQL based backends/stores

Introduction

With Eclipse EMF you can model your business domain (meta modeling) and persist instances of it into all kind of backends. As time goes by, you tend to add functionality to your application domain which involves changing the model (which is known as 'model evolution'). If you happen to change/evolve your model such that it is not compatible with its previous version, then, you need to prepare for complex migration procedures to transform one version (an old version) of your model into the a newer version.
For Eclipse EMF, there are several frameworks that are capable of persisting models into SQL based backends:
  • Eclipse CDO
  • Eclipse Teneo
  • Eclipse Texo
This article will demo a general approach to migrating EMF models that are persisted via Eclipse Teneo.
Eclipse Teneo is a framework which allows for connecting models via Hibernate to an SQL based database.
This is done internally by translating Eclipse Ecore meta models to Hibernate mappings which are translated themselves to SQL DDL statements.
The key point of the following approach is to grab the generated Hibernate mappings and use another tool that is capable of comparing two mappings (generated at two different points in time) of the same model. This tool is introduced in the next chapter: Liquibase.

Comparing Databases with Liquibase

Liquibase is capable of comparing two different 'Databases' with each other and generating a 'diff script' for execution in SQL backends.
A 'Database' can be a connection to a JDBC/SQL database or it can be some other sort of meta structure that describes a JDBC/SQL database. This is the key point of Liquibase for integrating Ecore meta models into it. As said, with Teneo we can generate mappings of our meta models which Liquibase can use as 'Database' for creating change sets which we can use to apply to another database for model evolution purposes.

A small demo

Just imagine a domain class called Book which looks like this (revision 0 of the meta model):


(This is borrowed from the 'Extended Library Model' available when installing the EMF SDK.)

Now, let us add some additional attributes to the book EClass (revision 1 of the meta model):
The changes include:
  • a new attribute of type float called 'price' (this is no incompatible change, but used to demonstrate some simple migration steps later)
  • changed the multiplicity of author to * and renamed it to 'authors'
Now, we need to compare both meta model revisions with each other and generate the 'diff script' (Liquibase migration script):
  1. Extract revision 0 from your source repository
  2. Extract revision 1 from your source repository
  3. Start Teneo to generate the Hibernate mapping of revision 0
  4. Start Teneo to generate the Hibernate mapping of revision 1
  5. Call Liquibase to compare mapping of revision 0 with mapping of revision 1 and generate the script
  6. Review and adapt the generated migration script
This is a very abstract algorithm, but was implemented for a customer and wrapped up in a JFace wizard for simplification:
The wizard collects all needed parameters from the user/developer and runs the above algoritm. In this case, the source repository was subversion and thanks to the Subversive plugin, no or minimal code was needed to choose and checkout the revisions.

The migration script looks like this (excerpt):


Liquibase handles 'migration steps' by the notion of 'change sets'. In our case, it has generated thre change sets (other change sets are not shown in the screenshot due to simplification of the demo):
  • an 'addColumn' instruction to add the new column 'price' to the table
  • a new junction table ('createTable' instruction) to reflect the many-to-many association of Book.authors and Writer.books (which are both set as eOpposites)
  • a 'dropColumn' instruction to remove the 'old author' column from the table 
In the review process of the generated migration script, we would have to review each instruction and check whether to keep it as-is, for example, the addColumn instruction which does not do any harm to the database, or to provide custom instructions for properly transitioning incompatible changes, for example the dropColumn instruction which leads to loss of information. In short, before executing the dropColumn instruction, we have to provide a new instruction to transform all rows of Book that contain an author value/reference into new rows in the new many-to-many table.
For example:

select i.book_id, i.author_id, 0 into book_authors from item i where i.author not null

(This is pseudo-sql and may have to be adjusted for the target DBMS, but you can tell Liquibase which DBMS is valid for each custom SQL.)

Summary/Conclusion

We have seen a possible approach to migrating Ecore meta model instances persisted into SQL backends using Teneo by leveraging the functionality of Liquibase.

As Liquibase operates on JDBC enabled databases, it can also be applied to the other EMF frameworks that persist models to SQL backends, for example CDO.

Another interesting point is to use EMF Compare (MPatch format) to generate Liquibase conditions to check whether each meta model change has been covered by the migration script.

Links

Liquibase: http://www.liquibase.org/
EMF: http://eclipse.org/modeling/emf/
EMF Teneo: http://wiki.eclipse.org/Teneo
EMF CDO: http://www.eclipse.org/cdo/
EMF Compare: http://eclipse.org/emf/compare

Montag, 1. Juli 2013

Eclipse E4, EMF and XWT in Action

Introduction

This article will show the Eclipse technologies stack consisting of Eclipse E4, EMF and XWT in action. First, we will have a look at the functionality the application has to provide, then see how this can be done using those Eclipse frameworks.

The application should be as in the following screenshot:


Requirements: User must be able to...

  • ... create a new layered geographic map or load a list of existing ones
  • ... create new layers (Markers/Points-of-interests, Google, OpenStreetMap, OGC WMS, GML, KML, ...)
  • ... re-order the layers of a selected map
  • ... edit layers, add new Points-of-interests (POIs) to a Markers layer and/or geocode them
  • ... show a preview of the map
All business cases can already be handled by the Geoff project. The interesting part is what frameworks we want to use to implement the requirements. Obviously, as the title says, we have chosen Eclipse E4 as the platform, EMF for modeling the business domain and XWT for declaratively defining the UI via XML.

Modeling our business domain

We are not going to describe the full domain model, but present a simplified one which looks like the following:


There is a base object GeoMap which has a list of Layers which can be any of Markers, OSM, Google, etc.
The full ecore meta model is available in the Geoff git repository. To simplify the UI development, we will use  the generated edit code of the model as well.

Defining the E4 application model

There is a left pane with some parts providing the editing capabilities and there is a right pane which hosts a preview of the configured map:


Providing the contents of the parts in XWT

The entry point of the application is the map selection/creation part:


This UI consists of a TreeViewer with the maps configured so far and a Toolbar (style=VERTICAL) with the actions.


A name is given to the TreeViewer via name="mapsViewer". This allows other objects to reference it. The input is configured using XWT's powerful binding expression: {Binding path=input}. This tells XWT to bind the 'input' property of the data object (provided to the root of the UI) to the 'input' property of the JFace TreeViewer. As we are using the generated EMF Edit code of our business model, we want to use an AdapterFactoryContentProvider as a content provider for out TreeViewer. This is done using the Make object which will use E4's DI engine to create and inject a new instance of the provided class. Remember that the regular AdapterFactoryContentProvider of EMF Edit does not allow DI, so, we have to redefine the class as folows:


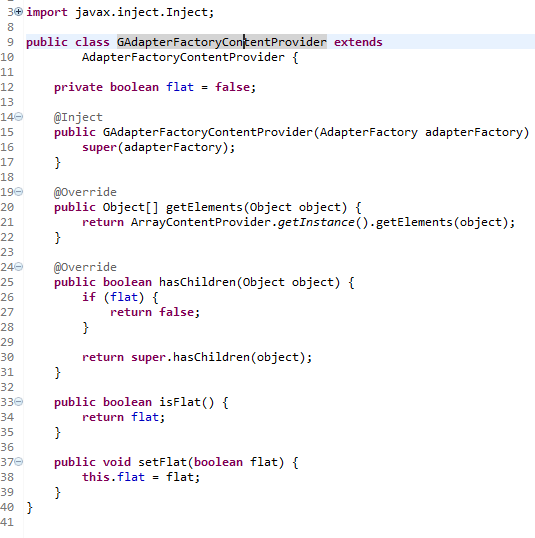
As you can see, we are using the @Inject annotation to get missing input, in this case, the DI will provide an AdapterFactory instance to the constructor. Furthermore, we make the content provider be able to hide all children in our root object (GeoMap), that is, we can make the content provider to only return a flat list of the elements. Background: JFace's ListViewer does not allow to show an object's image out of the box.
The label provider of our TreeViewer is configured in the same way.

Next comes a highlight of the XWT E4 integration efforts...
How would you listen for the TreeViewer's selection and put it to your IEclipseContext?

The E4 way would be:


So, lots of boilerplate code! In XWT this can be reduced to just an 'Export' instruction:


This tells XWT to listen to the viewer's singleSelection property and export it into the current IEclipseContext. Remember that Eclipse Contexts are hierarchical: if you are in a Perspective, then each part inside that Perspective has its own context. So, we have to walk one level up from the current context. In the Java code we have called context.getParent(). In the XWT Export instruction we do this by providing the level argument. In this case level="1" just means one level up, so, the export will be done in the Perspective's context and the object is available to all other parts in that Perspective.

Next, the ToolBar on the right side of the TreeViewer:


The UI definition should be self-explanatory, but there is one simplification here. We use XWT's selectionEvent attribute on each ToolItem to define the handling code. For instance, selectionEvent="newMap" tells XWT to look for a method in the handler class that is called 'newMap' and execute it once the ToolItem is pressed. The handling method looks like this:


The first thing to note is that the key point to using the E4 integration of XWT is to subclass your part's POJO from E4XWTUI.
Next, we annotate all fields we are interested in to be injected and define the event handler method newMap() which will be called once the ToolItem is pressed.

The next big step is to make different XWT UIs communicate with each other. In the prior step we listen to the TreeViewer's single selection property and export it into the current Perspective's IEclipseContext to make it available to other parts.
One other part is the Map Details Part:


Once the selection of the maps viewer changes, it will be exported for use with other UI parts.
The Map Details Part's UI looks like this:


To listen to IEclipseContext variables/objects that are set/reset, we have to use the Var instruction:


x:name="map" tells XWT to name this object "map", so other objects can reference it inside the same UI definition. varName="geoMap" tells it to listen for a variable called "geoMap" inside the active IEclipseContext chain.

Next, we can define all other UI controls, for example:


The interesting part is again the powerful expression: text="{Binding elementName=map, path=value.(g:GeoMap.name)}

This means to bind the GeoMap object's name property which can be obtained from the previous Var instruction to the text property of the SWT Text control.

The remaining UI is done following these principles.

Summary

The most important part of this article was to show XWT's E4 integration to create very complex and custom SWT UIs. This was achieved by providing the building blocks to make parts communicate with each other by publishing variables and listening to them.
The benefits we get when using these technologies stack:
  • E4's powerful DI engine and application model
  • EMF for rapid business domain modelling and code generation
  • strict separation of UI and business logic using XWT (no single SWT widget was instantiated in this application in Java code, all done in XML)
  • loosely coupled UIs that can communicate with each other via the IEclipseContext hierarchy


Freitag, 21. Juni 2013

Geocoding location names with Geoff

What is geocoding?

Imagine you have some data in a database that (logically) could be visualized on a geographical map, but you are missing the geographic coordinates (typically latitude/longitude pairs), i.e. you only have the object's logical name:
  • city names
  • postal addresses, street names
  • points of interest: restaurants and bars, libraries, shops, etc.
In order to get the coordinates, you could look up those names in a search engine and show it on a map like Goolge Maps does, then, grab its coordinates and assign them to the objects.
This process is called geocoding: assigning geographical coordinates to a location name.

Querying geocoding services

As you guess, manually geocoding location names can take a lot of time if you have a bunch of objects.
Luckily, this procedure can be automated. There are (public) geocoding services available that can be used to automatically lookup location names and get a geocoded equivalent:
  • Commercial geocoding APIs/webservices providers (Google, Microsoft, Nokia, etc.)- may be 'free' but constrained depending on how many queries you execute
    • Obtain a proper key from those providers
  • OpenStreetMap's geocoding (public) API/webservice - not to be queried in productional environments
    • Host the OpenStreetMap planet files yourself or 
    • consume from a (commercial) provider that has done this already

Using Geoff's API to query a geocoding service

The Geoff project (which is a proposed project at the Eclipse Locationtech IWG)  has a simple interface (IGeocodingService) that acts as a facade/frontend to the public/commercial geocoding services:

public List executeQuery(String query);

It takes a query string as parameter (a location name, for example) and returns a list of potential matches of type POI (point of interest) which has a LongLat (geographic coordinates) and service specific properties.
The result is a List of best matches of geocoded POIs as in general it is not always possible to uniquely identify the location name when automatic geocoding is done. In such cases, you will have to check and resolve the best match.

Currently, there is a default implementation that queries OpenStreetMaps's Nominatim to geocode location names. Other implementations may follow.

Visualizing geocoded location names with Geoff

Once you have finished the geocoding process, you can use Geoff to visualize the POIs on a map (in your Eclipse RCP application). The following steps will walk you through a simple use case...

Setup the map

Geoff has an EMF ecore meta model to define a map object.

1. create the root map container
GeoMap map = MapFactory.eINSTANCE.createGeoMap();
MapOptions opts = MapFactory.eINSTANCE.createMapOptions();
opts.setNumZoomLevels(16);
map.setOptions(opts);

2. create an OpenStreetMap base layer
OSM layer = LayersFactory.eINSTANCE.createOSM();
LayerOptions opts = LayersFactory.eINSTANCE.createLayerOptions();
opts.setIsBaseLayer(true);
layer.setOptions(opts);
map.getLayers().add(layer);

3. create a second layer that will contain some POIs (Markers)
Markers markersLayer = LayersFactory.eINSTANCE.createMarkers();markersLayer.setName("Markers");map.getLayers().add(markersLayer);

4. a) obtain a list of location names from some backend data source
String[] cities = new String[] { "Berlin", "Paris", "London", "Madrid", "Rom" };

4. b) geocode the location names and add to second layer
IGeocodingService geo = IGeocodingService.Util.getFirstFound();
for (String city : cities) { List results = geo.executeQuery(city); if (!results.isEmpty()) { POI poi = results.get(0); Marker marker = MarkersFactory.eINSTANCE.createMarker(); LonLat lonLat = TypesFactory.eINSTANCE.createLonLat(); lonLat.setLon((float) poi.getLatLon().getLon()); lonLat.setLat((float) poi.getLatLon().getLat()); marker.setLonLat(lonLat); markersLayer.getMarkers().add(marker); }}

Setup the UI container (this part is SWT/E4 specific)

@PostConstruct
public void createUI(Composite parent) {
GeoMap map = ... //map object populated in first step
GeoffMapComposite mapComposite = new GeoffMapComposite(parent, SWT.NONE);
mapComposite.setMap(map, "map");
}

Preview

The output should be similar to the following screenshot...


How was that done?

GeoffMapComposite is a wrapper for SWT's Browser widget. It runs the JavaScript framework OpenLayers. Once you call GeoffMapComposite.setMap(), it will use Geoff's code generation functionality to generate OpenLayers specific JavaScript code at run-time and execute it in the wrapped Browser widget.


Mittwoch, 27. März 2013

Geoff: Visualizing geographical maps in Eclipse RCP/RAP applications

The Eclipse Foundation has set up a new industry working group, namely LocationTech.
Its main focus is on

- Storage and processing of massive data volume
- Model driven design
- Desktop, Web, and mobile mapping
- Real time analysis of business critical data

With geoff (geo fast forward), I have proposed a new project that aims at providing a solution to be used for existing (or maybe new ones, too) Eclipse RCP applications to enable visualization of geographical (geo spatial) maps. It uses model driven design (EMF) to provide a declarative configuration of a layered map that can be rendered via the JavaScript framework called OpenLayers 2.12.


EclipseSource's Ralf Sternberg was very cooperative to host an RAP version of the current state on their demo server - Thanks a lot!

Geoff RAP Demo Application

You can follow the progress on GitHub: Geoff on GitHub